Secure home server with Unraid and Cloudflare
I built a home server earlier this year to serve as a NAS and home media center. I’m trying to make a more concerted effort to take control over my own data and rely less on cloud services.
I chose Unraid as the underlying operating system. If you’re building a home server, I really recommend checking it out. Out of the options I tried, Unraid was by far the easiest to get up and running with.
The Problem
The entire purpose behind building my home server was so I could take control over my data and rely less on cloud services. But this presents a problem: if I wanted to access my data from outside my home network, then I had to open up access to the server from the wider internet.
This isn’t a problem per-se, but I was really not into the idea of having the server open to the internet. What if there was a 0-day with Unraid or an app that I was using? I’m planning on putting a lot of data on this server, some of which is going to be highly personal, and I really really don’t want to have to worry about security issues that might lead to data leaks.
There are a number of ways you could solve this problem. One of the more common ways is to use a VPN to restrict access to the server. But I thought that would be clunky. Imagine I wanted to hop on to my Paperless site to fetch a document on my phone – how annoying would it be to have to connect to a VPN first.
Defining the goals
-
I wanted to access services I run on my home server with an easy to remember domain name. For example,
https://paperless.example.com/would load Paperless. -
I wanted a way to totally lock-down access to the running services until I was authorised. E.g. say Paperless’ login process had a 0-day vulnerbility that allowed anyone to bypass the login, I wanted to be immune to that sort of bug. I wanted any anonymous connection to be simply impossible.
-
I wanted an easy way to bypass these restrictions on my local network.
-
I wanted to make sure I could still log in to the server via SSH remotely, just in case.
Putting together a plan
Domain Mapping
The first thing on the list is domain mapping. I want a certain hostname to map directly to a running service on Unraid. For example, paperless.example.com needs to connect to Paperless which is running on port 8555 in a docker container.
I run all of my services as docker containers, and one of the easiest ways to get this all set up is to run a reverse proxy with Traefik: Connection -> Traefik -> Docker -> Backend App.
Access Control
Goals 2-4 are really all a variation on the same theme – access control. For this I chose to use Cloudflare Access along with Cloudflare Argo Tunnel.
- Cloudflare Access: Is basically a “login screen” that sits between the wider internet and your backend service. So a user goes to app.example.com and Cloudflare Access will make the user authenticate before they will allow requests through to the backend. If the user doesn’t or can’t authenticate, then requests simply don’t get through.
- Argo Tunnel with
cloudflared: This is a daemon that runs on the server that establishes a persistent connection from the Unraid server to Cloudflare. All traffic between Cloudflare and Unraid flows through this tunnel. Since the tunnel is established from within the home network, it means we don’t have to allow inbound connections, we don’t have to set up port forwarding, we don’t have to think about firewalls, and we don’t have to think about dynamic DNS.
Combining these two things means:
- There simply is no exposed network to the internet. There is nothing to “hack” because we just don’t allow incoming connections.
- We lock-down access to specific people we want to give access to via Access policies. E.g. I have mine locked down to just my email address and my partners email address.
(Worth saying that the single vulnerability point here is Cloudflare. We are placing a lot of trust in Cloudflare’s systems being secure.)

At the time of this writing, Cloudflare Access is free for up to 5 user accounts, and then is $5/user/month after that.
Setup: Your domain with Cloudflare
- Sign up at Cloudflare
- Register a domain name. My registrar of choice is Porkbun.
- Follow your registrars instructions to set Cloudflare nameservers.
- Add your domain to Cloudflare.
Setup: Cloudflare Access
Once that’s done, you need to go and configure Cloudflare Access. Click the “Access” icon and enable Cloudflare Access on your account. You can configure any kind of login methods, but I actually just keep the default “One-time Pin” method which sends you a code via email that you have to enter.
Access policies to create
Create initial access policies for these three domains that we are going to set up now:
unraid.YOUR_HOST_NAME.com– this will load the unraid web UI.ssh.YOUR_HOST_NAME.com– Thesshsubdomain will be used for SSH access.traefik.YOUR_HOST_NAME.com– Thetraefiksubdomain will be used as a dashboard to show you traefik info.
Here’s an example policy that allows based on an email address:

Setup: Argo Tunnel
Next, we should set up Argo Tunnel. To do this you will need to SSH into your Unraid box.
Save files and binaries
There are two binaries we need to install on Unraid:
cloudflared– The daemon that establishes the tunnel with Cloudflaresupervisord– A process manager that we can use to make sure cloudflared is always running and gets restarted in the event of a crash. The linked project here is a golang implementation of supervisord because I wanted a single-binary to copy, rather than the original version written in Python.
I’ve taken the liberty of creating a tarball of everything you need here: https://nadeau.io/post-files/unraid-cloudflare/custom.tgz
You need to install these files to /boot/config/custom.
You can’t install it to a user mount because we need it to run even if the Unraid array is offline, and you can’t install it anywhere else on the filesystem because the rest of the filesystem is reset after each reboot.
So here’s an example SSH session:
cd /boot/config
curl -L https://nadeau.io/post-files/unraid-cloudflare/custom.tgz -o custom.tgz
tar zxvf custom.tgz
Which will extract to:
* /boot/config/custom
	* /cloudflared
		* cert.pem
		* cloudflared
	* /supervisord
		* supervisord
		* supervisord.conf
Modify the hostnames in config
You need to edit the supervisord.conf file to change the hostnames. In the config, change YOUR_HOST_NAME.com to your real domain name.
There are two tunnels we’re setting up with two different host names:
unraid.YOUR_HOST_NAME.com– theunraidsub-domain will be used for HTTP(S) connections (that will go through to Traefik, which is described below)ssh.YOUR_HOST_NAME.com– thesshsub-domain will be used for SSH, so you can always SSH into the box remotely.
cd /boot/config/supervisord
nano supervisord.conf
When done, press Ctrl+O to write the file, followed by Ctrl+X to exit the nano editor.
Initiate the domain with Cloudflare
Still connected via SSH, execute:
cd /boot/config/cloudflared
cloudflared tunnel login
- The command will output a URL you need to copy+paste into your browser
- Log in using your Cloudflare account
- And then click on the domain you added to Cloudflare before.
After you finish, you should see something like this in your terminal:
You have successfully logged in.
If you wish to copy your credentials to a server, they have been saved to:
/root/.cloudflared/cert.pem
Move the filename dislpayed here to /boot/config/custom/cloudflared/cert.pem. For example:
mv /root/.cloudflared/cert.pem /boot/config/custom/cloudflared/cert.pem
Test the tunnel
It’s a good idea to test out the tunnel now. Let’s test out the SSH tunnel by starting it in the foreground:
cd /boot/config/cloudflared
cloudflared --origincert cert.pem --no-tls-verify --hostname ssh.YOUR_HOST_NAME.com --url ssh://localhost:22
You’ll see a bunch of output but after a few seconds, you should be able to open a SSH connection through ssh.YOUR_HOST_NAME.com (e.g. open another terminal window and try it out). You should have already created a policy for the ssh sub-domain in a previous step; so when you try to SSH through this host now, you should have to log-in via the Cloudflare Access web UI before the connection is allowed.
Install boot script
Now you need to edit /boot/config/go which is a Bash script that Unraid executes automatically whenever the server boots up. You’ll need to add a few lines to this script to make sure supervisord runs at boot.
cd /boot/config
nano go
And then at the bottom of the file add these lines:
cp -R /boot/config/custom /root
chmod +x /root/custom/cloudflared/cloudflared
chmod +x /root/custom/supervisord/supervisord

/root/custom/supervisord/supervisord -c /root/custom/supervisord/supervisord.conf -d
When done, press Ctrl+O to write the file, followed by Ctrl+X to exit the nano editor.
Reboot
Reboot your Unraid server now so the tunnel starts. Test out the SSH tunnel again just to make sure it’s running.
Setup: Traefik
Go ahead and install the Traefik community app.
I suggest you change the repository value to “traefik:1.7.26”. When I installed this app, it was defaulted to “traefik:latest” which ended up breaking my install a couple days later when a major new version was released with breaking changes.
Here are the options I suggest you set. You’ll note that I’ve removed some of the default options by clicking the “Remove” button.
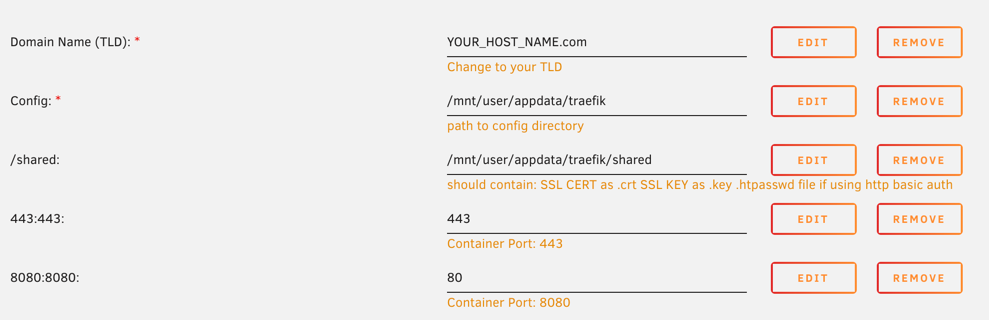
The important change here is to make sure the 8080 is 80, and 443 port is 443. In other words, we want default HTTP(S) traffic going to Traefik.
Edit config
Connect via SSH again, we’re going to edit /mnt/user/appdata/traefik/traefik.toml
nano /mnt/user/appdata/traefik/traefik.toml
Make it look like this:
debug = true
logLevel = "debug"
InsecureSkipVerify = false
defaultEntryPoints = ["https", "http"]

[entryPoints]
  [entryPoints.traefik]
  address = ":8082"
  [entryPoints.http]
  address = ":8080"
  [entryPoints.https]
  address = ":443"
    [entryPoints.https.tls]

[docker]
endpoint = "unix:///var/run/docker.sock"
domain = "${DOMAINNAME}"
watch = true
exposedbydefault = false

[api]
  entryPoint = "traefik"
  dashboard = true

[file]

[frontends]
  [frontends.unraid]
  passHostHeader = true
  backend = "unraid"
    [frontends.unraid.routes.r1]
    rule = "Host:unraid.YOUR_HOST_NAME.com"

  [frontends.traefik]
  passHostHeader = true
  backend = "traefik"
    [frontends.traefik.routes.r1]
    rule = "Host:traefik.YOUR_HOST_NAME.com"

[backends]
  [backends.unraid]
    [backends.unraid.servers.s1]
    weight = 1
    url = "http://10.0.0.24:2095" # CHANGEME - the IP and port of unraid web control panel

  [backends.traefik]
    [backends.traefik.servers.s1]
    weight = 1
    url = "http://127.0.0.1:8082"
- Change the YOUR_HOST_NAME.com to your own domain (on two lines).
- And change the CHANGEME line containing the ip/port of your unraid server.
At this point you should be able to load https://unraid.YOUR_HOST_NAME.com/ in your browser to load the Unraid web UI.
Configure apps
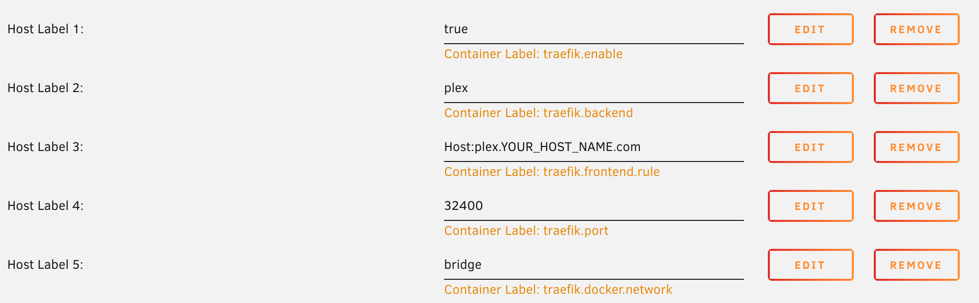
For every docker app you want to expose, you need to add labels with the following keys:
traefik.enablewith the valuetrue. This tells Traefik that you want to enable routing to this app.traefik.backendwith the value of the Name of the docker container. E.g.deluge,plex,paperlessetc. Whatever is in the Name field at the top of the page.traefik.frontend.ruleshould be in the form ofHost:whatever.YOUR_HOST_NAME.com- the name you choose here can be whatever you want, it doesn’t have to be named after the app. E.g.Host:plex.YOUR_HOST_NAME.comis valid but so isHost:superfreak.YOUR_HOST_NAME.comtraefik.portthe port inside the container to forward requests to. Note that this is the port for the service running INSIDE the container, not the mapped port.traefik.docker.networkshould almost always bebridge
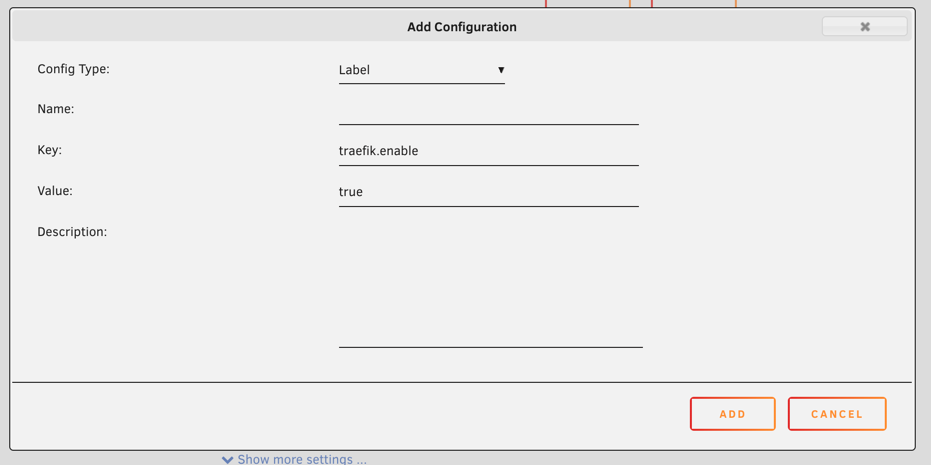
So to do this, you go into a docker app in Unraid, and click “Add another Path, Port, Variable, Label or Device”.
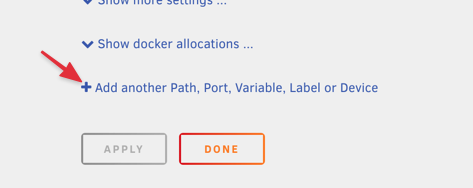
Switch “Config Type” to “Label”, and then in the “Key” field input the label key listed above and in the “Value” field input the value as described above.
For example, I have Plex running on my box that looks like this:
Configure DNS for each app
Back in Cloudflare, go to the DNS tab on your domain. If the Argo Tunnel is running (it should be by now, if you’ve rebooted your server), you’ll see a special record for the unraid subdomain:

For each app you configured in the previous step, we need to create a CNAME record to this unraid name. For example, if you have a “plex” app and want “plex.YOUR_HOST_NAME.com” and you prepared the labels on the docker container, you’d now add a new CNAME record for that:
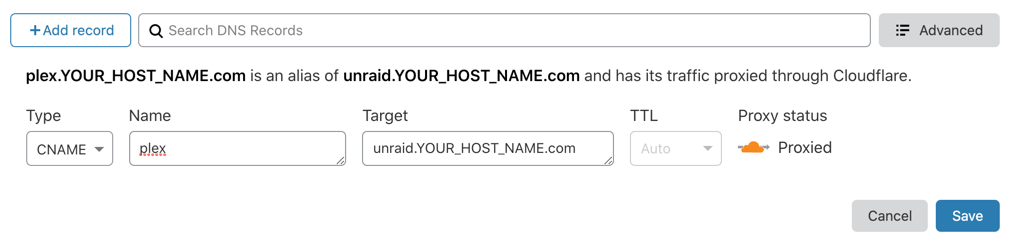
Then go back to the “Access” tab and add a policy for this app like you did before.
It’s important you add a policy now, otherwise the app will be world-accessible.
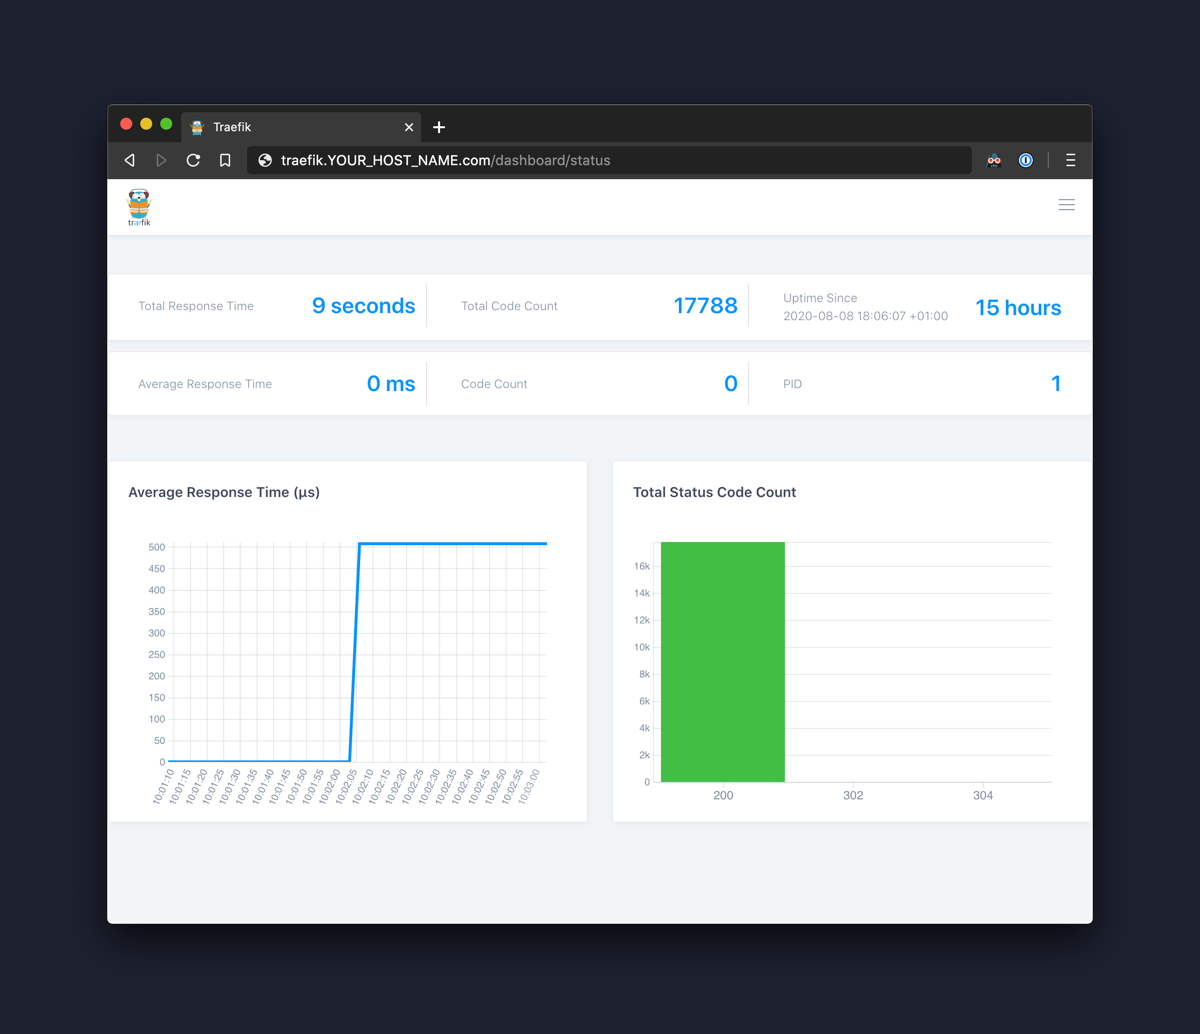
Traefik Dashboard
If you want the Traefik dashboard to work, you should create a CNAME for traefik.YOUR_HOST_NAME.com (and an accompanying policy) now. It’s not totally necessary, but it can be useful to see the status and health of the services running.
Try it out
At this point you should have:
- Argo tunnel running on the unraid host
- Traefik running
- Your app(s) docker containers labelled with the
traefik.*keys - Cloudflare CNAMEs created for your app(s)
- Cloudflare Access policies created for your app(s)
If it’s all working as it should, you should be able to go to https://yourapp.YOUR_HOST_NAME.com in your browser, and use the app.
Setup: Use friendly names on the local network
So this is all great when we’re away from home. But when we are home, we don’t want to proxy all traffic through Cloudflare because it’s going to introduce unecessary internet traffic. And for me at least, I didn’t want to enforce the same level of access control when using these apps from home.
You can obviously just continue to use the services via their IP/port combos like you might usually, but now that we have Traefik installed, it’s simple to add a secondary hostname so we can get friendly names we can use at home.
Note your private IP for the unraid server
You need to note down the private IP address of the unraid server within your home network. For example, mine is 10.0.0.24.
You should configure your router to always assign this IP address to the Unraid server. How you do this will depend on your router, but it’s usually under DCHP settings.
Set up DNS
Back in Cloudflare, go to the DNS tab once more, and add two new A records:
local- and
*.local
Both of these records should point to the private IP address of your unraid server (e.g. mine is 10.0.0.24).

Set up Traefik routes
Go back to each docker app you added labels for. Remember the traefik.frontend.rule with the Host: value? This can actually take a comma-separated list of rules. So what we can do is add a second host, one for the local domain.
For example:
- Before:
Host:plex.YOUR_HOST_NAME.com - Change to:
Host:plex.YOUR_HOST_NAME.com,plex.local.YOUR_HOST_NAME.com
This means Traefik will know how to respond to both of those host names.
The main host name has DNS that points to Cloudflare and gets processed by Cloudflare (with Access and through the tunnel); then this new local host name has DNS that is your private IP address that will only work from within your home network. Anyone else who tries the local hostname won’t be on your network and so their requests won’t go anywhere.
Limitations
The major limitation to this method is that it only works for HTTP(S) traffic from a browser, or for SSH. That means other protocols won’t work, and any app that has a dedicated mobile app most likely won’t handle the Cloudflare Access auth flow (e.g. the actual Plex app on iOS).
Solving some of these limitations in other ways is the subject of another blog post!